

To design your own house, write down what you need (bedrooms, bathrooms, size and how you live), turn that list into a first floor plan, refine it room by room, furnish it with real furniture sizes, check it in 3D, then export a PDF or DXF your builder can work from. You can design your own house online free to start, and you don’t need CAD skills. An AI home design tool can draft a furnished layout from a few answers, and you can edit it by hand until it fits the way you live.
This guide on how to design your own house is for homeowners planning a new build, self-builders and anyone mapping out a major renovation. The five steps work with any tool, and each one is shown in Maket.
Key takeaways
- Start with a written brief. Rooms, size and lifestyle first, software second.
- Let AI draft, then edit by hand. A generated plan is a starting point to react to, not a finished design.
- Plan with your real furniture. Turn a photo of a piece you own into a 3D model and place it at its real size.
- Check it in 3D before anything is built. Hallways and sight lines read differently at eye level.
- Know when to bring in a professional. Structural changes, permits and difficult lots still need an architect or building designer.
Why designing your own house is more achievable than ever
Until recently, getting from an idea to a floor plan meant sketching on graph paper or paying someone to draw it. Professional CAD software takes weeks to learn. Today a home design app that runs in your web browser can turn a description of the home you want into a measured, editable plan in minutes, and you can change it yourself as often as you like.
That changes where your time goes. Instead of learning floor plan software, you spend it on the decisions only you can make: where the morning light lands, how far the laundry is from the bedrooms, whether the kitchen opens to the living room. AI house design handles the first draft. An architect still adds a lot later on (more on that in Step 2), but you can arrive with a plan that already reflects how you live.
Step 1: Define your needs before you open any tool
A clear brief makes every later step faster, whether you hand it to an AI, a designer or your own pencil. Write down:
- Bedrooms and bathrooms. Count who sleeps in the house today and in five years. Decide whether each floor needs a full bathroom, a half bathroom (toilet and sink only) or both.
- Must-haves and nice-to-haves. Split the list in two. A home office might be essential, while a mudroom or a game room can go if space runs short.
- A rough size target. Pick a total floor area in square feet or square metres. If you’re building on a lot, local zoning rules may limit how much of it the house can cover, so check before you settle on a number.
- How you live. Open plan or separate rooms? One storey or two? Bedrooms away from the living area, or the kids’ rooms close to yours?
It helps to collect house layout ideas as you go. If you’re browsing small house plans, 2 bedroom house plans, 3 bedroom house plans or open concept floor plans for inspiration, note what you like about each one, such as a kitchen island facing the yard or a primary suite at the back of the house.
Then think in furniture, not just rooms. A 10 by 12 ft bedroom fits a queen bed (60 by 80 in) with about 2½ ft to walk on each side and more than 5 ft at the foot. In a 10 by 10 ft room, the space at the foot drops to about 3 ft, before a dresser goes in. Measure the pieces you already own and add them to your brief. You’ll use those numbers again in Step 4.
Step 2: Choose the right design approach
There are three ways to get a first plan. Pick the one that matches what you already have.
| Approach | Best for | What you need |
|---|---|---|
| Describe your vision to an AI floor plan generator | The fastest start, with no design experience | Your brief: floors, floor area, shape and rooms |
| Draw from scratch in a floor plan creator | You know the measurements, or you’re planning changes to a home you live in | Your measurements and a web browser |
| Upload an existing plan | Renovations, or a plan from a builder or real estate listing | A PDF or image of the plan (paid plans in Maket) |
You can mix them. Many people generate a plan with AI, then draw their changes by hand. Step 3 walks through each path. If you’d rather draw house plans yourself, Maket’s Floorplan Studio is a simple floor plan maker and floor plan drawing tool. Dimensions appear as you place each wall, which makes it an easy floor plan maker even if you’ve never learned how to draw a floor plan.
When to involve a professional architect
A floor plan you design yourself is a strong starting point, not a permit set. Maket works as a house blueprint maker for the design stage, with every wall, door and window to scale, but it isn’t a stamped blueprint. Bring in a licensed architect or building designer when:
- you’re moving or removing load-bearing walls, adding a storey or changing the roof;
- you need drawings for a permit, which in many places must be prepared or approved by a licensed professional;
- the lot is tricky: a slope, a narrow frontage, setbacks or easements;
- you want the structure, insulation and ventilation engineered properly.
Coming to that first meeting with a plan you’ve already tested gives them a clear picture of what you want.
Step 3: Get your first floor plan
Follow the path you picked in Step 2. All three end in the same editable plan, so the last part of this step, refining it, applies whichever way you started.
Path 1: Generate it with AI
With an AI floor plan generator, your brief becomes the input. Here’s how it works in Maket.
 ▶Play video
1Start a new project
Click Generate a new floor plan on the home page. The Maket chat opens on the left.
2Answer the questions one at a time
Maket asks for the number of floors, the floor area, the layout shape (where the living space sits, the front door, and any garage or outdoor space) and the rooms you need. Answer each question as it comes. One long message describing your dream home won’t work: anything that doesn’t map to an answer isn’t registered.
3Confirm, and add any layout constraints
Before generating, Maket shows a summary of what it captured. If a detail you care about isn’t there, it won’t be in the plan. Choose Yes, please generate, or add layout requirements first, like keeping the office away from the bedrooms or opening the kitchen onto the back patio.
4Stay on the page while it generates
Generation takes about three to five minutes, and longer for more than one floor. Leaving the page interrupts it.
5Review the plan
The plan arrives on the canvas, furnished and named after what you asked for, such as “2 beds, 1 bath, 1,195 sqft”. The floor plan generator fits your rooms into the footprint you set.
It’s a free AI floor plan generator to start: the Free plan’s 30 credits cover one single-floor plan (20 credits per floor). Multi-floor plans are on paid plans. See Generating a floor plan.
What a good first AI draft looks like
Treat the first result as a draft to react to. It won’t be perfect, and it isn’t meant to be built from as it is. Floor plan AI also can’t account for your local regulations or the setbacks on your lot. What you should see is every room you asked for, sitting in a sensible relationship to the others, inside the footprint you chose. If the overall arrangement is wrong, ask for another option from the same answers rather than fixing it piece by piece.
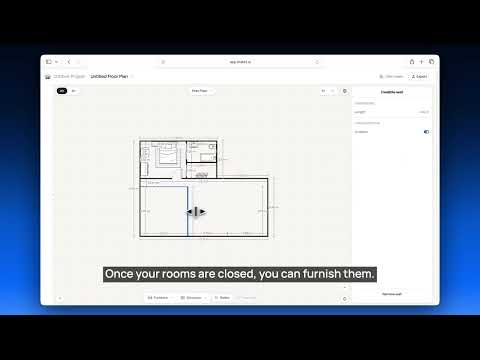
Path 2: Draw it from scratch
Drawing is the right start when you already know the shape of the space: a home you’re measuring, a sketch on paper, or a footprint you have in mind.
1Start a blank plan
From your home page, choose Draw plan from scratch. You land on an empty canvas.
2Draw the walls
Click Draw wall in the bottom toolbar, then click to place each corner. Dimensions appear as you draw. Click Select when you’re done.
3Name each room
Select a closed room and set its room type in the panel on the right. New rooms start as Generic.
4Let Maket fill in the rest (optional)
Draw only the outer shape, then tell Maket in the chat what you need inside it, such as three bedrooms and two bathrooms. It fills in the rooms and keeps your outline exactly as you drew it. If you’ve already placed a room where you want it, say so, and Maket lays out the rest around it.
 ▶Play video
Path 3: Upload a plan you already have
Already have a plan from a builder, a listing or an old renovation? Maket turns a PDF or image into a plan you can edit.
1Upload the file
On the Home page, click Upload your floor plan and choose a PDF, JPG or PNG up to 20 MB. For a multi-floor home, upload a multi-page PDF and pick one page per floor.
2Let Maket read it
A progress panel shows the walls and rooms Maket recognizes as it draws them over your plan. When it finishes, the editable plan opens on the canvas.
3Get help if it isn’t right
Automatic recognition is a first pass. If yours comes back with errors, Maket offers recognition assistance: a person redraws the plan to scale, usually within 24 hours, at no extra charge on paid plans.
Uploading is available on paid plans and uses 20 credits per floor, the same as generating. See Upload your own floor plan and How to draw a floor plan from scratch.
Refine your floor plan
Whichever path you took, the plan opens in the same floor plan editor. This is where you really design your own house floor plans, and hand edits in Maket are free and never use credits.
1Find your way around the editor
The top toolbar switches between 2D and 3D, changes floors, and holds the settings (the gear), where you choose metric or imperial. Undo and redo work in both 2D and 3D. Whatever you select, its properties open in the panel on the right.
2Move rooms and walls
Drag a room to a new position, or add a room and pick its type from the list. Select a room and drag its handles to resize it, or select a wall and type its length, so the editor works as a room layout planner and a room planner with dimensions. To push out a long wall made of several segments, hold Cmd (Mac) or Ctrl (Windows) and click it to select the whole run.
 ▶Play video
 ▶Play video
3Open up the plan with invisible walls
For an open kitchen, dining and living area, keep them as separate rooms and select the wall between them. Under Configuration, turn on Invisible. The plan reads as one open space, but each area keeps its own room type, furniture and finishes. Only internal walls without a door or window can be hidden.
4Adjust doors and windows
Select a door to set its type (hinged, sliding or pocket), its width and height, and which way it swings. Set the type first, because changing it resets the size. Windows get a width, a height, a sill height and a distance from the ceiling; whichever value you set last is the one that sticks.
5Ask the chat for bigger changes
On paid plans you can ask Maket to swap two rooms, flip or mirror the layout, widen the doorways, or rework a few rooms. Ask for one change at a time; small, specific requests succeed far more often, and each takes a few seconds.
6Duplicate to compare options
Before a big change, click the arrow next to the plan name and choose Duplicate. You get a copy to experiment on while the original stays as it was. Duplicating is available on paid plans.
For every editing tool, see Editing tools overview and Adjusting doors and windows.
Step 4: Furnish it and see it in 3D
A floor plan hides a lot. A hallway that looks fine from above can feel tight at eye level, and a living room only looks crowded or empty once the furniture is in. That’s why 3D floor plans are worth checking before you commit. Furnish the plan first, then look at it in 3D.
Furnish it in one click
1Select the room
Click the room’s floor, not a piece of furniture. The panel on the right shows its name and dimensions.
2Set the room type
Under Configuration, pick a Room type, such as Bedroom, Kitchen, Home Gym or Walk-in Closet. A room left as Generic can’t be furnished automatically.
3Click Furnish room
Maket places furniture that suits the type: a bedroom gets a bed, nightstands and a dresser; a kitchen gets counters, a sink and a fridge.
 ▶Play video
4Adjust the pieces
Select any piece to rotate it, flip it, change its finish or remove it, and drag it to move it. On kitchen counters, the countertop and cabinet finishes are set separately. To move a whole arrangement, select several pieces and change them together. Used this way, the editor doubles as a furniture layout tool and room furniture planner.
 ▶Play video
See Furnish a room in one click.
Add your own furniture to the floor plan
Generic furniture tells you whether a room works in general. Your own sofa tells you whether it works for you. With Bring Your Own Furniture, Maket turns a photo of a sofa, bed, table or cabinet into a reusable 3D model with its height, width and depth. A product shot works, and so does a photo of a whole room. Think of it as an AI 3D model generator for furniture: a furniture visualizer and room visualizer built into the plan, so you can see furniture in your room before you move in or buy anything. The result is a floor plan with furniture you actually own.
 ▶Play video
1Open Create your own
In your plan, open Objects and click Create your own.
2Upload a photo
Upload or drag in one JPEG, PNG or WebP image. Choose a clear, well-lit photo where the piece isn’t blocked by other objects.
3Select the piece
Maket finds the items in your photo and colors each one. Click the piece you want. You can pick several, and each one becomes its own object.
4Check the dimensions and create the object
The photo to 3D model step takes about 30 seconds. Drag the preview to check the piece from every side, name it, and replace the estimated height, width and depth with the numbers from the spec sheet or your tape measure. Then click Create object.
5Place it in your plan
Open Objects, go to Custom and drag your piece onto the plan. Rotate or flip it in the panel on the right.
Place the largest pieces first (sofa, bed, dining table, main storage), then check that people can walk past them and that doors and drawers still open. That’s the simplest answer to how to visualize furniture in a room: real sizes, in the real plan.
Each new object uses 10 AI credits and is saved for reuse across your plans. Image to 3D model conversion works from a single photo, so you don’t need GLB, OBJ or SketchUp files. For every detail, see the Help Center guide to Bring Your Own Furniture.
Choose a style and finishes
1Select what you want to style
In 2D, select the floor, one room, a wall or a single piece. Design references follow your selection, which is how your kitchen gets one look and your living room another.
2Pick a style and finishes
Under Design references, choose a Style for the overall direction, then set Finishes: on a floor, that’s flooring, walls, ceiling, doors, windows and exterior walls, each set separately.
Switch to 3D and walk through it
Maket’s 2D to 3D conversion works from the plan you already have, so there’s nothing to rebuild to convert the floor plan to 3D. Your 2D floor plan becomes a 3D floor plan, with your own furniture in place.
1Flip the 2D/3D toggle
It sits in the top-left corner of the canvas. Use the navigation dropdown beside it to choose a view, and the floor dropdown to change floors.
2Walk through at eye level
In Walkthrough, drag to look around and use the arrow keys to move. To jump to another room, drag the camera marker on the mini plan on the right. The gear sets camera height and field of view. Walk the routes you’ll take every day: front door to kitchen, bedroom to bathroom.
 ▶Play video
3Check the whole floor and the outside
Isometric shows the whole floor at an angle; double-click a room to focus on it and rotate it. Massing lets you orbit the outside of the house. Furnished and in 3D, the plan becomes a 3D room planner for every space.
 ▶Play video
Render a photo-style image
To show family, a contractor or a real estate agent how a room will feel, use floor plan rendering. Each render uses 10 credits.
1Frame the shot first
The render bar sits at the bottom of every 3D view, and whatever is on screen is what gets rendered. Move the camera until the view looks close to the photo you want, then write.
2Describe the space, materials, light and details
Name the room in one line, then the surfaces people look at, where the light comes from, and three or four real objects. For example: an open-plan kitchen and dining area, wide-plank white oak floors, limewashed walls, a honed marble island, late afternoon sun, a bowl of lemons on the table. Click Render scene.
3Attach a reference image for the look
Click into the prompt field, attach an image with the paperclip, and say what it’s for, such as “Use the materials and lighting from the attached image.” Maket keeps your layout and borrows the materials, palette and styling.
4Swap in furniture you’re considering
Screenshot a sofa, chair or table from a store’s website, frame the piece it should replace, attach the screenshot and ask: “Replace these exact pieces of furniture with the ones attached.”
5Render again
Every render is generated fresh, so the same prompt gives a slightly different picture each time. Change one thing and go again; two or three passes usually gets you there. Exterior renders invent more, because the 3D model doesn’t include roofing or landscaping yet, so describe the roof and surroundings.
See Viewing your floor plan in 3D and Tips for generating better renderings. To learn how to use AI to design a room’s style, see AI room design.
Step 5: Export and share your plans
When the layout feels right, export your floor plan in the format the next person needs.
| Format | Who it’s for | Availability in Maket |
|---|---|---|
| View-only link | Family, contractors and agents who need to look, not edit | Every plan, including Free |
| Printing, getting quotes and marking up on paper | Paid plans | |
| DXF | Architects, designers and drafters who open it in CAD software such as AutoCAD or Revit | Paid plans |
| All renders | Anyone you’re showing the finished look to | Paid plans |
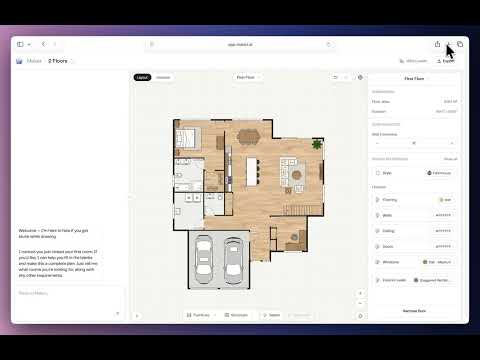
Share a view-only link
1Turn on the share link
Open the share options and switch the link on. Copy it, or post it straight to LinkedIn or X.
2Send it
Anyone can open it without a Maket account. They can switch floors, toggle metric and imperial, show or hide dimensions, furniture and room labels, measure distances and see your renders, but they can’t edit or export your plan.
 ▶Play video
3Turn it off when you’re done
Switch the link off at any time and it stops working immediately.
Download a PDF, DXF or your renders
1Click Export
It’s in the top-right corner of the editor, just left of your credit balance.
2Choose a format
Pick PDF for printing and reviews, DXF for CAD, or All renders for every image in the project. The download starts when the export is ready. If you started from an uploaded PDF or JPG, the DXF is how you turn it into a CAD file.
Exporting and downloading require a paid plan. See How to download and export your floor plan.
What your contractor needs from you at this stage
A plan at this stage is enough for a contractor to give a rough estimate and spot problems early. Send:
- the floor plan for every floor, with room names and dimensions;
- your must-have list from Step 1, so they know what can’t be cut;
- the finishes you’ve chosen, plus any 3D views or renders;
- what you know about the lot or existing house: a survey, photos, setbacks.
Expect them, or an architect, to turn it into construction drawings before anything is built.
Common mistakes to avoid when designing your own house
Ignoring natural light and window placement
Work out where the sun comes from before you place rooms. In the northern hemisphere, south-facing rooms get the most daylight, so living areas often go there, and bedrooms can face east for morning light. Most building codes also require bedrooms to have a window you can escape through in an emergency, so a bedroom with no exterior wall is a red flag.
Underestimating hallway and circulation space
Circulation is the space you walk through to get from room to room. It’s the easiest thing to squeeze and the quickest way to make a home feel cramped. The International Residential Code sets a minimum hallway width of 3 ft, and kitchen planning guidelines recommend aisles of 42 in for one cook and 48 in for more than one. Look for doors that swing into each other, too.
Designing rooms without measuring existing furniture
A room that’s the right size on paper can fail the day the sofa arrives. Measure the large pieces you’re keeping (Step 1), add them as 3D furniture models at their real size (Step 4), and check that doors and drawers still open around them. The standard interior door is 32 in wide, so make sure your biggest pieces can get through as well.
These numbers are a starting point, not a permit. The IRC is a US model code that each jurisdiction chooses whether to adopt, and other countries have their own. Confirm the rules with your local building department.
Frequently asked questions
How do I design my own house layout?
List your rooms, target size and how you live, then turn that brief into a floor plan with an AI floor plan generator or a free online floor plan creator. Refine the layout by hand, furnish it, check it in 3D, and export it for your builder.
Can I design my own house without an architect?
You can design the layout yourself, and many people do. For structural changes, permit drawings or a difficult lot, you’ll still need a licensed architect or building designer, and local rules may require one.
Is there a free home design app to design my own house?
Maket is a house design app that runs in a web browser on your computer, so there’s nothing to install, and you can try AI home design free. The Free plan includes 30 one-time credits, enough to generate a single-floor plan, and drawing and hand edits never use credits. You can also share a view-only link for free. You do need a free account so your plan is saved.
How do I make a floor plan for my house?
Measure each room or decide your target sizes, pick a scale, and draw the walls, doors and windows. Or generate a plan from a few answers about floors, floor area, shape and rooms, then edit it.
Can I add my own furniture to a floor plan?
Yes. In Maket, upload a photo of the piece, select it, check its dimensions and create a 3D object. It uses 10 AI credits and is saved under Objects → Custom for any of your plans.
Can AI design a house?
AI can draft a furnished residential floor plan in minutes from your answers. Treat it as a first draft: it can’t account for your local regulations or lot setbacks, so check every dimension and have a professional review anything you plan to build.
Can I turn a 2D floor plan into a 3D model?
Yes. Going from a 2D floor plan to 3D model takes one click in Maket: the 2D/3D toggle shows the same plan as a 3D walkthrough at eye level, an isometric view or a massing view, with no rebuilding.
What file format do builders need?
Most contractors are happy with a PDF they can print and mark up. Architects and drafters usually want a DXF, which opens in CAD software such as AutoCAD or Revit.
Five steps from idea to plan
Write down what you need. Pick the approach that fits. Get a first plan and refine it by hand. Furnish it, with your own pieces if you like, and walk through it in 3D. Then share it, or export it for the people who will build it. The sooner your ideas are on a plan, the sooner you can see what works.
Start designing your floor plan free ↗Sources
- Minimum dimensions in the IRC, Fine Homebuilding
- Kitchen Planning Guidelines, NKBA
- Standard door sizes, Bob Vila
- Generating a floor plan, Maket Help Center
- Editing tools overview, Maket Help Center
- Bring your own furniture: turn a photo into a 3D model, Maket Help Center
- How to draw a floor plan from scratch, Maket Help Center
- Upload your own floor plan, Maket Help Center
- Adjusting doors and windows, Maket Help Center
- Create open-plan spaces with invisible walls, Maket Help Center
- Duplicating projects and floor plans, Maket Help Center
- Furnish a room in one click, Maket Help Center
- Adding design references, Maket Help Center
- Tips for generating better renderings, Maket Help Center
- Viewing your floor plan in 3D, Maket Help Center
- Download and export your floor plan, Maket Help Center
- What plans does Maket offer?, Maket Help Center
- How credits work, Maket Help Center